Repairing Vintage Sewing Machine Zigzag
Repairing Vintage Sewing Machine Zigzag: A Friendly Guide
Vintage sewing machines are treasures of the past. They sew strong, steady stitches and look beautiful on any crafting table. But even the best old machines need help now and then—especially with zigzag stitches. In this guide, you’ll learn the basics of repairing vintage sewing machine zigzag problems. We’ll use the popular Necchi Supernova Julia as our example, but the tips work for many other models too. Grab your tools, and let’s bring that zigzag back to life!
TIP: Keep a phone or camera nearby. Snap photos of every step so you can put each screw and panel back in the right spot. A few quick pictures save lots of guessing later.
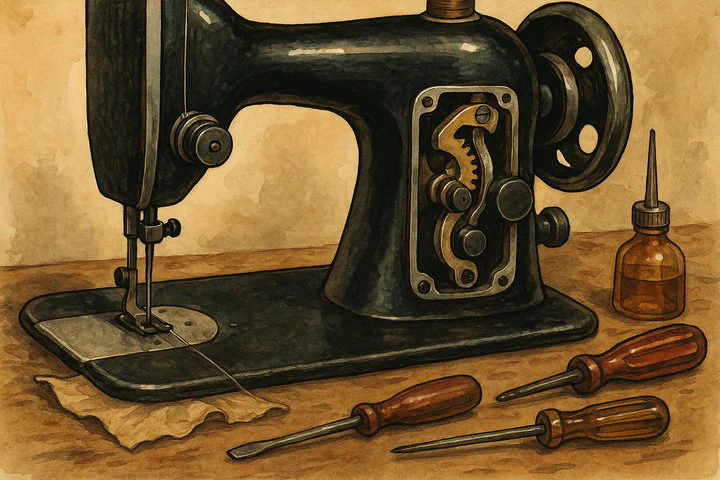
Understanding Your Vintage Sewing Machine
The Necchi Supernova Julia is loved for its bright colors and smooth stitching. After years of sitting in closets or attics, though, some owners find that the zigzag lever will not budge. In their words, “the zigzag mechanism was completely stuck.” Dried grease, dust, and misaligned parts are the usual culprits.
Vintage machines use small gears and sliding parts—think tiny metal blocks that move side to side—to create zigzag stitches. When old oil hardens like glue, those parts freeze. That’s why many folks look for help repairing vintage sewing machine zigzag systems.
Diagnosing the Problem
- Set your machine on a sturdy table and unplug it.
- Turn the handwheel. Does it feel stiff or lumpy? If yes, the inside parts need attention.
- Gather a small screwdriver, cotton swabs, sewing machine oil, and a flashlight.
- Remove the top and side covers. Work slowly; old screws strip easily.
- Shine your light inside. Sticky, yellow‐brown grease is a sure sign of trouble.
While you watch the moving parts, try turning the stitch‐width lever. If nothing shifts, apply one drop of oil and wait a few minutes. Even a tiny wiggle is a win—time to say, “I have managed to get that moving!”
Many readers send us “Necchi Supernova Julia zigzag and clutch questions,” worried that the clutch causes the jam. A quick clutch check comes later, so stay tuned.
Repairing the Zigzag Mechanism
Place an old towel under the machine to catch drips. Use your cotton swab to dab fresh oil on every moving joint. A warm hair dryer set on low can soften old grease. After 30 seconds of heat, turn the stitch‐width lever again. If it starts to slide, great! Keep adding clean oil and gently wiping away sludge. Remember: slow, steady pressure is safer than forcing parts.
Once the moving parts glide smoothly, test a scrap of fabric. If the needle swings left and right without skipping, you can happily declare, “the zigzag is now moving OK.” Take a clear photo of this success; it keeps future fixes easier.
Troubleshooting Clutch Issues
The clutch lets you wind bobbins without moving the needle. If it sticks, the handwheel may freeze even after your zigzag is fixed. Here’s how to check it:
- Unplug the machine.
- Press the small knob in the middle of the handwheel.
- Spin the wheel toward you.
If the wheel will not turn, loosen the tiny set screw on the handwheel, slide the wheel off, and clean inside with rubbing alcohol. Add one drop of oil, reassemble, and test again. Many people report, “I have managed to get that moving,” after this simple cleaning. This step also answers many Necchi Supernova Julia zigzag and clutch questions in one go.
Maintaining Your Vintage Sewing Machine
Now that your zigzag works, keep it healthy:
• Clean and oil after every big project. • Store the machine in a dry place with a dust cover. • Turn the handwheel monthly so parts don’t freeze. • If stitches tighten or slow, remember how “the zigzag mechanism was completely stuck” before and act fast.
Visual Help: Search online for diagrams or videos of the Necchi Supernova Julia. Seeing the parts move on-screen makes each step clearer, especially for beginners.
Join the Community
Crafting is more fun together! Share your progress photos and questions in friendly groups like r/SewingWorld, r/knittinghelp, or right here on Crafting Inspirations. Reading stories that end with “the zigzag is now moving OK” will boost your confidence and inspire others.
Call to Action
Ready to start repairing vintage sewing machine zigzag problems on your own machine? Gather your tools, follow the steps above, and give it a try. When you succeed, post your before-and-after photos and tips on Crafting Inspirations or your favorite sewing forum. Your story may be the help another crafter needs tomorrow. Happy sewing, and may every zigzag stitch be smooth and strong!